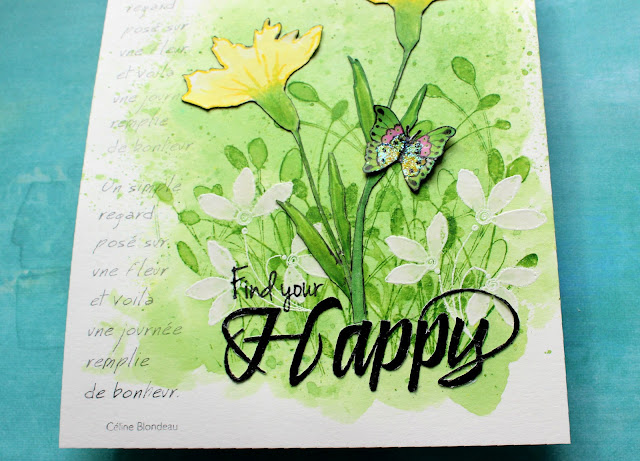
Pages

Sunday, February 27, 2022

Find Your Happy


Hello crafty friends! Today, I am sharing an art journal page that is sure to bring some sunshine and smiles with its fresh greens, sunny yellow flowers and a sparkly butterfly. Makes me feel like spring is just around the corner.


I made this one on Strathmore 8 x 6" mixed media paper for a page in my loose page art journal. I used a variety of different techniques from emboss resist, watercolour stamping, heat embossing and fussy cutting. Full step-by-step instructions can be found on my post on the Magenta Blog here.


Supplies: Un Simple Regard, Petal Trio, Tranquil Buds, Doodle Flower, Find Your Happy Place, Happy Birthday Stamps, patterned paper & Grass Green Nuance (Magenta), Mixed Media Paper (Strathmore), White, Clear & Black emboss powder (Simon Says Stamp), Cadium Yyellow, Dark Chrome Yellow, Light Green, Permanent Green Olive Big Brush Markers (Faber- Castell), VersaMark ink pad & pen, Black StazOn ink (Tsukineko), white cardstock (Staples), Tim Holtz Black Soot Archival ink, Mustard Seed, Mowed Lawn & Peeled Paint Distress Ink, Star Dust Stickles (Ranger), pencil crayons (Staedtler), 03 Black Pigma Micron Marker (Sakura), Black Sharpie


It has been a while since I have participate in a Simon Says Stamp Monday Challenge and I was inspired to make an art journal page when I saw this week's challengeClick on the Simon Badge below to see their DT's gorgeous creations and for the challenge details.

TTFN,


Sunday, January 30, 2022

Spreading Lots of Love


Hello Crafty Friends! Today with a super slimline Valentine card. Valentine's Day is around the corner as we head into February and any reason to spread love is a good thing especially in these ongoing challenging times.


I started with a 3" x 8 1/2" piece of kraft cardstock and using low tack tape like painters tape or a post-it, secure the top two rows of the stencil to the centre left side if you are right handed and the centre right side if you are left handed (that way you are less likely to smudge the ink as it will take a bit to dry but you can continue to work on it. 

First, blend on a good amount of Unicorn White Pigment ink. Reposition to the remaining side and repeat. Be sure to thouroughly dry before blending on the coloured inks. You can set it aside to dry while making multiples or speed up the drying with a heat gun. Be sure to clean and dry the stencil before proceeding to the next step.

Align the heart stencil back over the white stenciled area and slightly offset it to the right to allow a smidgeon of white to show as a highlight and secure it. Then, using a blending brush/tool, start applying colour, I used Worn Lipstick Distress Oxide ink, from the top getting really light as you get towards the bottom to create an ombre effect.

Once the ink is dry, I traced Magenta wood veneer letters with a black fine line marker to add the word LOVE behind the hearts. I added mini sequins to each hearts top left section and wood veneer YOU to finish it off.
 
From my heart to yours.
TTFN,


********
Magenta products used:

TM210 - 15 Hearts Stencil


Saturday, January 1, 2022

Happy New Year!


A little sparkle and shine makes me happy.


Wishing you much health and happiness in 2022.

TTFN,


Magenta Products Used:

Saturday, December 25, 2021

A Merry Magenta Christmas


A little Merry Magenta Christmas today on the Magenta blog as the DT gals share their Holiday Wishes with Magenta friends around the globe.


My card contribution poinsettia is stamped first with a base of Unicorn Pigment White ink and then stamp coloured with Prima water-soluble Pastels and water spritzes layered on top. I stamped the multilingual Merry Christmas with Gold Delicata Ink and stamped it before adding some glue stick to the edges and a touch of foil.

Hope you have a day filled with family and fond memories.

Stay safe,

TTFN,


Supplies: Poinsettia and Multilingual Merry Christmas (Magenta), Kraft card stock (CTMH), white cardstock (Creative Scrapbooker Superstock), Unicorn White Pigment ink (Hero Arts), IOD water soluble Oil Pastels (Prima), Gold Delicata Ink (Tsukineko), gluestick (UHU), gold foil (Prima), clear drops (Studio Katia) 

Magenta Products Used:

Christmas Flower- Poinsettia


Multilingual Merry Christmas


Wednesday, September 29, 2021

With Gratitude Card - Watercolour Stamping


Hello Crafty Friends! Today I am on the Magenta Blog with this fall foliage card full of beautiful oranges, yellows and reds with a sprinkling of gold.


I used combinations of Distress inks (Mustard Seed, Fossilized Amber, Spiced Marmalade, Carved Pumpkin, Barn Door and Crackling Campfire) as I loaded the stamp with ink, stamped it,  and reloaded with ink again & spritzed with water. Next, I used a thin watercolour brush with water and pulled the ink from the edges of the leaves and moved the colour around and into the background spaces. Once that area was dry, I stamped the image again before repositioning it into a new spot on the 4 x 6 " Bristol paper using my MISTI. Then, added ink splatters with the paint brush and gold Sheer Shimmer Spritz splatters with the nozzle straw. Once that was dry, I stamped the sentiment by mixing the Gratitude stamp with the "with" part of the With Sympathy stamp. Lastly, I wrapped the panel with twine, mounted it onto a 4.5 x 6.5" kraft card base, and added a few gold jewels.

I am loving this branch of Leaves stamp as it lends itself to multiple uses. Looking forward to creating more with it.

TTFN,


*********
Magenta Products Used:

0825

Monday, August 30, 2021

Alcohol Ink Transfer Card


Hello Crafty Friends! Today I am on the Magenta Blog with this soft coloured kraft card made using Alcohol Lift Ink.  I have used the pre-stamping with a white pigment ink on kraft for a past card creation on the Magenta Blog (you can see it here) and wanted to experiment with how it would work with transferring the colour from an alcohol inked panel on top of the pigment ink. I think you will agree that it works great!


First, I made the alcohol inked panel on Yupo using blending solution, Amethyst, Pool, Turquoise, & Citrus Alcohol inks.

This is another technique that works best with a stamp repositioning tool. I folded the kraft cardbase and placed it in the MISTI. I positioned the Mandala stamp partially off the side and stamped it multiple times with white pigment ink. After cleaning off the pigment ink, I swapped out the card for the inked Yupo securing it in place. I loaded the stamp with Alcohol Lift ink and stamped the panel. Next, I swapped the panel for the card and stamp transferred the alcohol ink that had been transferred to the stamp over the white pigment ink image. I repeated this process multiple times until I was happy with the colour coverage and intensity. I added some white splatters and set it aside to dry. Then, I white heat embossed stamped the Hello sentiment on vellum and fussy cut it before adhering it. To finish off the card, I added jewels around the mandala pattern.

I hope you liked this technique and that I have inspired you to give it a try. You can check out my Be Happy card here for more kraft with white pigment ink card ideas.

TTFN,


********
Magenta products used:

Flower Mandala - Large

Thursday, August 26, 2021

Leafy Green Thank You


Hello Crafty Friends! Today, I am sharing a peek at a leaves stamp from an upcoming new Magenta collection.


I started with a 6" x 6" piece of Strathmore Bristol. Using a MISTI stamp repositioning tool is key for the watercolour stamping technique that I used here which consists of loading the stamp with ink, spritzing it with a fine mist, stamping it, painting it with a brush by moving the ink around, and then reloading and re-stamp to crisp up the image. I started with Tim Holtz Twisted Citron Distress ink. Next, I used Mowed lawn. Then, Rustic Wilderness  and lastly, Pine Needles. For the Thank You sentiment, I clear heat emboss stamped it onto vellum and then ran it through the laminator with gold foil. I fussy cut it leaving a vellum outline and used clear foam tape to pop it up. 


I started with a 6" x 6" piece of Strathmore Bristol. 
Using a MISTI stamp repositioning tool is key for the watercolour stamping technique that I used here which consists of loading the stamp with ink, spritzing it with a fine mist, stamping it, painting it with a brush by moving the ink around, and then reloading and re-stamp to crisp up the image. I started with Tim Holtz Twisted Citron Distress ink. Next, I used Mowed lawn. Then, Rustic Wilderness  and lastly, Pine Needles. For the Thank You sentiment, I clear heat emboss stamped it onto vellum and then ran it through the laminator with gold foil. I fussy cut it leaving a vellum outline and used clear foam tape to pop it up. 


Supplies: Branch of Leaves & Thank You stamps (Magenta), Canson XL watercolour paper, Twisted Citron, Mowed Lawn, Rustic Wilderness, & Pine Needles Tim Holtz Distress Inks (Ranger), VersaMark ink (Tsukineko),  Gold emboss powder (CTMH), vellum (The Paper Company), clear foam tape (Kool tak)


TTFN,


*********
Magenta products used:
Branch of Leaves Coming Soon!

Sunday, August 15, 2021

Llovable Llama


Today, I have a fun rainbow embossed llama card inspired by this month's Hero Arts blog Stay Crafty with Hero Rainbow Challenge and the Simon Says Stamp Monday Challenge for Heat Embossing. My colouring for Kathy Racoosin's Colouring Challenge on this one is with Distress inks.


Supplies: Bristol Smooth (Strathmore), llama die, sentiment & sunglasses from Llama Stamp & Cut set (Hero Arts), Brush Stroke Heart from Brush Stroke Messages stamp set, clear & white fine embossing powder, Assorted Moonshine sequins (Simon Says Stamp), VersaMark ink (Tsukineko), Tim Holtz Distress Inks (Picked Raspberry, Mustard Seed, Peacock Feathers, Wilted Violet) and Black Soot Archival ink (Rangers), black marker (Sharpie), silver glitter foam (Dollarama)


I started with a piece of Bristol smooth and blended on four distress ink colours (Picked Raspberry, Mustard Seed, Peacock Feathers and Wilted Violet) using a sunrays stencil as a guide being sure to blend the overlapped areas to get the other three colours (orange, green, & indigo) for a full rainbow spectrum. Once coloured, I spritzed and splattered the panel to get a bunch of texture. After the panel fully dried, I swiped it with an antistatic powder pouch and then used VersaMark ink to stamp the brush stroke heart from the Simon Says Stamp Brush Stroke Messages stamp set. I added clear emboss powder and heat set it. Next, I spritzed the panel and wiped of the colour for a muted effect and to accentuate the hearts. While that was drying, I die cut the Llama from glitter foam using the larger llama from the Hero Arts Llama Stamp and Cut set. Then, I stamped the sunglasses in Black Soot ink and the sentiment in VersaMark ink and heat set both with glasses with clear emboss powder and the other in white. 

With all the parts ready, it was time to assemble the card. I glued down the panel to the card base corner. Next, I adhered the glasses to the llama before adhering it to the card. I popped up the sentiment and the added some shadow to the llama with a Stabilo All graphite pencil and water. Then, I glued on some Assorted Moonshine sequins thinking I was done but I decided it needed some more black so I added faux stitching along two edges. There you have it... Llots of Llove with a llovable llama.

You can check out each challenges details over on the Hero Arts blog here, Simon Says Stamp Monday Challenge Blog here and Kathy's Blog hereI am also entering this one into the SSS Flickr Challenge 182 - Anything Goes. 


TTFN,


Friday, July 30, 2021

Smile Easel Card


Hello Crafty Friends! I am up on the Magenta Blog today with the second watercoloured card made from the Magenta Floral Background stamp panel.  If you missed my first card from this set, you can find it here. This time, I used the 2 3/4" x 5 1/2" remaining panel piece to make a fun and floral "Pick Me Up" easel card.


To recap how I made the panel... I started by stamping with VersaMark ink and clear heat embossing the image on 140 lb cold press watercolour paper. Next, I watercolour painted the panel with Grass Green, Hot Pink, and Turquoise Nuance powders. Once dry, after cutting a 1 1/2" strip from the panel (which is the part that I used on the first card), I used the remaining piece as the top part of the tent based easel card.


The card is 4 x 5 1/2" in size. Once you have the panel that you want to use created, set it aside as you prep the card base. Make a tent card for the size of the front panel that you wish to use. After you have made the first fold of your tent card, fold the top panel in on itself to the centre fold, halfing it or folding it in by one quarter. Then unfold it back to a standard tent card.

For mine, I ventured into my stash and used some items that I haven't in ages. I used a lace pattern border punch on the edge of the top panel and added crochet ribbon and jewels. Next, I added gold foil to the edge of the watercoloured panel piece and adhered it to the remaining 1 1/4" of the folded bottom part of the front of the card base. This leaves the top portion unglued which it allows it to raise up once the easel part is created.

I used a 1/2 double sided tape on the bottom part inside edge and transferred gold foil onto it. Opening up the card, I adhered a thin piece of stitched velvet ribbon and another lace bordered punch piece of watercolour paper painted with the Grass Green Nuance to create the easel part.


Between the gold leaf edge and the scalloped lace boarder, I stamped the sentiment (after doing a little stamp surgery) using a MISTI so as to ensure that the stretched out sentiment was straight. To finish the front, I cut and adhered a small piece of vellum to back the gold glitter wood veneer letters from a dollar store that I used for the smile sentiment. Lastly, I added some Stardust Jelly roll pen for shimmer to the centres of the flowers.


I created a coordinating envelope out of green cardstock and I made it a bit larger to accommodate the size of the veneer letters. 


There you have it, one watercoloured panel, two cards. If you were inspired by either of these cards, be sure to share your creations either with me here or over on my Magenta post or on Instagram.


TTFN,


Tuesday, June 29, 2021

Feeling Floral


Hello Crafty Friends! Today, I am up on the Magenta Blog with a simple Nuance watercoloured card made using the Magenta Floral Background stamp.


I started by stamping with VersaMark ink and clear heat embossing the image on 140 lb cold press watercolour paper. Next, I watercolour painted the panel with Grass Green, Hot Pink, and Turquoise Nuance powders. Once dry, I cut 1 1/2" squares out of it and arranged them on the 5 1/2" x 3 1/2" card base. Then, I stamped the Feel Better Soon with Black Soot Archival ink. Lastly, I embellished it with Moonshine sequins.

TTFN,